0

Nude is never out of style...

What?!?!!  Two manicures and two blog postings in two days?  Maybe I AM turning over a new leaf...but probably not :)


I did however do a new manicure today for New Year's eve - I hope you love my classy and understated holiday nail-abration!  This is Zoya "Pandora", a metallic finish nude polish with the perfect undertones for my skin, and a gradient sponging of Finger Paints "Twisted" from the new flaky line.   Oh, and these are my new sexy nude heels - I scored them at 90% off this week, woot!   Now I just need that "perfect little black dress".  Any suggestions?


0

Make new friends, but keep the old

I considered going all out and doing a glitter gradient manicure, very appropriate and expected for New Year's Eve - but I decided to go with something a little more "me" today, since it's my birthday today and I'm not likely to change my nails for tomorrow!  


My old friend is probably my favorite ever - Zoya "Harlow".  The new girls are Essence "Rock" topcoat, and Finger Paint's "Twisted"

If you have everything to replicate this one, you must be my polish twin or just really really addicted to everything polish.
The details:
This layering features Zoya "Harlow", a gorgeous matte plum color with a glow all her own - sorry girls, she's been discontinued, so you have to search or swap to find her.  Next, I used Finger Paint's new release, "Twisted" from their flaky collection due to be released on the 1st of January '12.  Finally, I spread a good thin layer of Essence's "Rock" topcoat, which gives the whole look a deeper smoky effect.  Sorry if you're looking for that one as well, it was not released in the US and from what I hear, it dissapeared pretty quickly overseas as well.

Christmas Inspiration: Holiday Sweater Mani

Hello there!  
I know, I know, you thought they'd sent me to the padded room, but in all actuality I've just been procrastinating, failing to photograph my manicures, and chasing the 4 very mobile children around.  
But, I knew when I saw Through the Wormhole's "Christmas Sweater Mani" I had to do something inspired by it.   PLEASE check hers out, because her freehand skills are beyond belief and mine don't compare for the time being.

That said, I'm pretty happy with how they turned out - and thanks Candice for letting me borrow your brushes!

 (Dominant Hand - I spy:  a reindeer, a christmas star, a snowflake)


(Non-Dominant Hand - I spy: a reindeer, a christmas tree, and a big mess)

For those curious on colors used:  the base is Julep "Diane", the red is Zoya "Isla", blue is Zoya "Breezi", gold is Sally Hansen "Time to Shine", the olive-green is Zoya "Dree" and the white is a Sally Hansen insta dry of Candice's that I borrowed xD

The holidays are amazing

Just another mini update:   I got my Polish Aholics Anonymous secret santa gift, from the amazing Flery Perez this last week.   Prepare to be blown away:
I am so blown away!

Fozzie Wozzie was a muppet...

I decided to do a mani for the OPI Fozzie Bear nail art contest...whatcha think?
Feel free to check here daily and vote for me and your other favorites!
2

Minicure Monday: Tangled in her...TOMS?!?!?

OK, I admit it.   I just did this minicure to show off the makeover I gave my princess' Tom's.
You see, after much Tom's bashing and resistance, I finally assimilated and bought a pair for my darling daughter's first year of public school this year.   This is the pair we picked up:


Super adorable, right?  But, true to Tom's and especially true to this fabric, the toe soon wore out and was threadbare.  Soon, as in after less than 10 uses.
As a frugal mommy, this was deeply upsetting - especially given the high quality of the sole and insole of the shoe.   So, instead of tossing them, I decided to try the ever popular makeover - Tangled style.   I know you're dying now, right?  OK, here's the photos:

 The finished product (and look, nails!   See, this is relevant...)


A couple of comparisons of the damaged shoe, and the finished product for you:


 I won't lie - it was a lot of work, a fair bit of frustration, but she and I are both ecstatic 
with the end product - even better than the original.  


2

Mini post: Bieber Groupie Franken and Stamping...

Please forgive my absence, I've really been trying to strengthen my nails and techniques - I've got a super exciting post coming Monday, involving Toms, Tangled, and my lovely daughter's mini mani.   But for today, just a quick refeature of my franken. "Bieber Groupie" - to tell you the truth, I have only ever heard "Baby" and I'm not personally a Bieber-ite, but that's the first thing this franken polish made me think of when I finished creating it.   

I recently discovered it's brilliance in stamping - here, layered over Zoya "Blaire", a fun vampy red.  
(Bieber Groupie alone)
I intend to decant a little bit of this and send it to my Polish Aholics Anonymous Secret Santa.   I hope she loves it!

Mapped Mani

I am SO excited to share this manicure with you!   As soon as I read up on newspaper manicures, I knew where I wanted to take it - I present to you, the Map Manicure.  This one is perfect if you're headed on vacation, dreaming of traveling the world, or just looking for something fantastic!

I did have a bit of trouble with application at first, so I'll finish this post off with my own step by step tutorial.

Here's the other hand, for your viewing pleasure ;)

My only regret is that everything is backwards...I wish it looked like this (I flipped it in photoshop)...

Are you ready for yours?   Here's the list of things you'll need:
  • A small dish with alcohol (I used rum...yum!)
  • Pieces of a map, cut to the approximate size of your nails
  • Base nail polish color, nothing too dark
  • Clean up tools
  • Topcoat
Step 1:  Paint 2 coats of your base color, no topcoat (yet), let dry until no longer tacky.

Step 2:  Dip your first finger in the alcohol
Step 3:  Place the cut map over your nail, press until it is damp from the alcohol (add a drop if necessary), then wait a minute


Step 4:  Carefully peel off paper (some should stay with the image on your nail.  If not, you didn't get it damp enough or press hard enough) 


Step 5:  Gently rub the excess paper off - it should not appear white


Finish off with a coat or two of your favorite topcoat, and you're good to go!   A bit of work for sure, but worth the extra effort and easier overall than a water marble manicure.  

(Ta-daaa)

Backlog post: Welcome, fall!

Hey friends!   This is my first freehand mani since I began blogging, forgive me for using an old one (I did it a couple of weeks ago), but I really wanted to share it with you.  And I am sick with the zombie virus, so this may be the last chance to see my nails before I start eating brains, and who knows what that will do to my nail quality.

 I did some sponging on the bottom layer, with greens and oranges (details to follow), and then freehanded Loreal "Owl's Night" over the top. 
Sally Hansen "Ivy League", Sinful Colors "Rich in Heart", Loreal "Owl's Night", Julep "Zoe",  and Zoya "Shawn"


Now, off to make lunch.  Braiiiiiinssss.....
0

Under Construction!

Sorry it's been so long!  I am working on a revamp now that I have a functional computer.  I promise, good things are coming!


  • Better manicures!
  • Better photos!
  • More regular postings!
  • Tutorials
  • New Collection announcements
  • Blog Roll of OSM nail blogs
  • Collaberations
  • Giveaways here and the hookup to other giveaways
I hope you stick around to catch it all!
0

AMAZING giveaway! Go enter NOW!

Go check out this AMAZING giveaway by Polish Changes.  If you win, be warned, I may hunt you down for your winnings.
2

Reviews and swatches: Huemorista polishes


I know I promised these forever ago, I hope you'll forgive me!   I was so excited to get the Huemorista polishes, and there are not very many reviews on them.  I ordered "Hidden Rainbow", "Unzipped", "Midnight Invite", "Sex on the Moon" and "Promise Ring". 


First up:  The ever popular "Hidden Rainbow:
Here is the promotional picture from Huemorista's Etsy site:
Described as "Very light gray with multi-colored glitter particles and more medium-sized round glitters as well." The polish in person is closer to the description than her photos, definately grey and not white, with a good sprinkling of smaller glitters and a few larger ones.  This has been compared to Deborah Lippmann's "Glitter in the Air", which may explain it's popularity.
 
(4 coats - 1 coat)


Next up:  Sex on the Moon
Promotional Picture
She describes this one as "Dusty purple based gray with a fuschia flash and opalescent flakies"
The texture in the promotional photo is quite a bit different from what I get when I paint it out, and it's much less of a purple/grey duo than a muted dusty purple for me.  That said, it is very pretty and the glitter is pretty eye catching!
 
(1 coat - 4 coats)

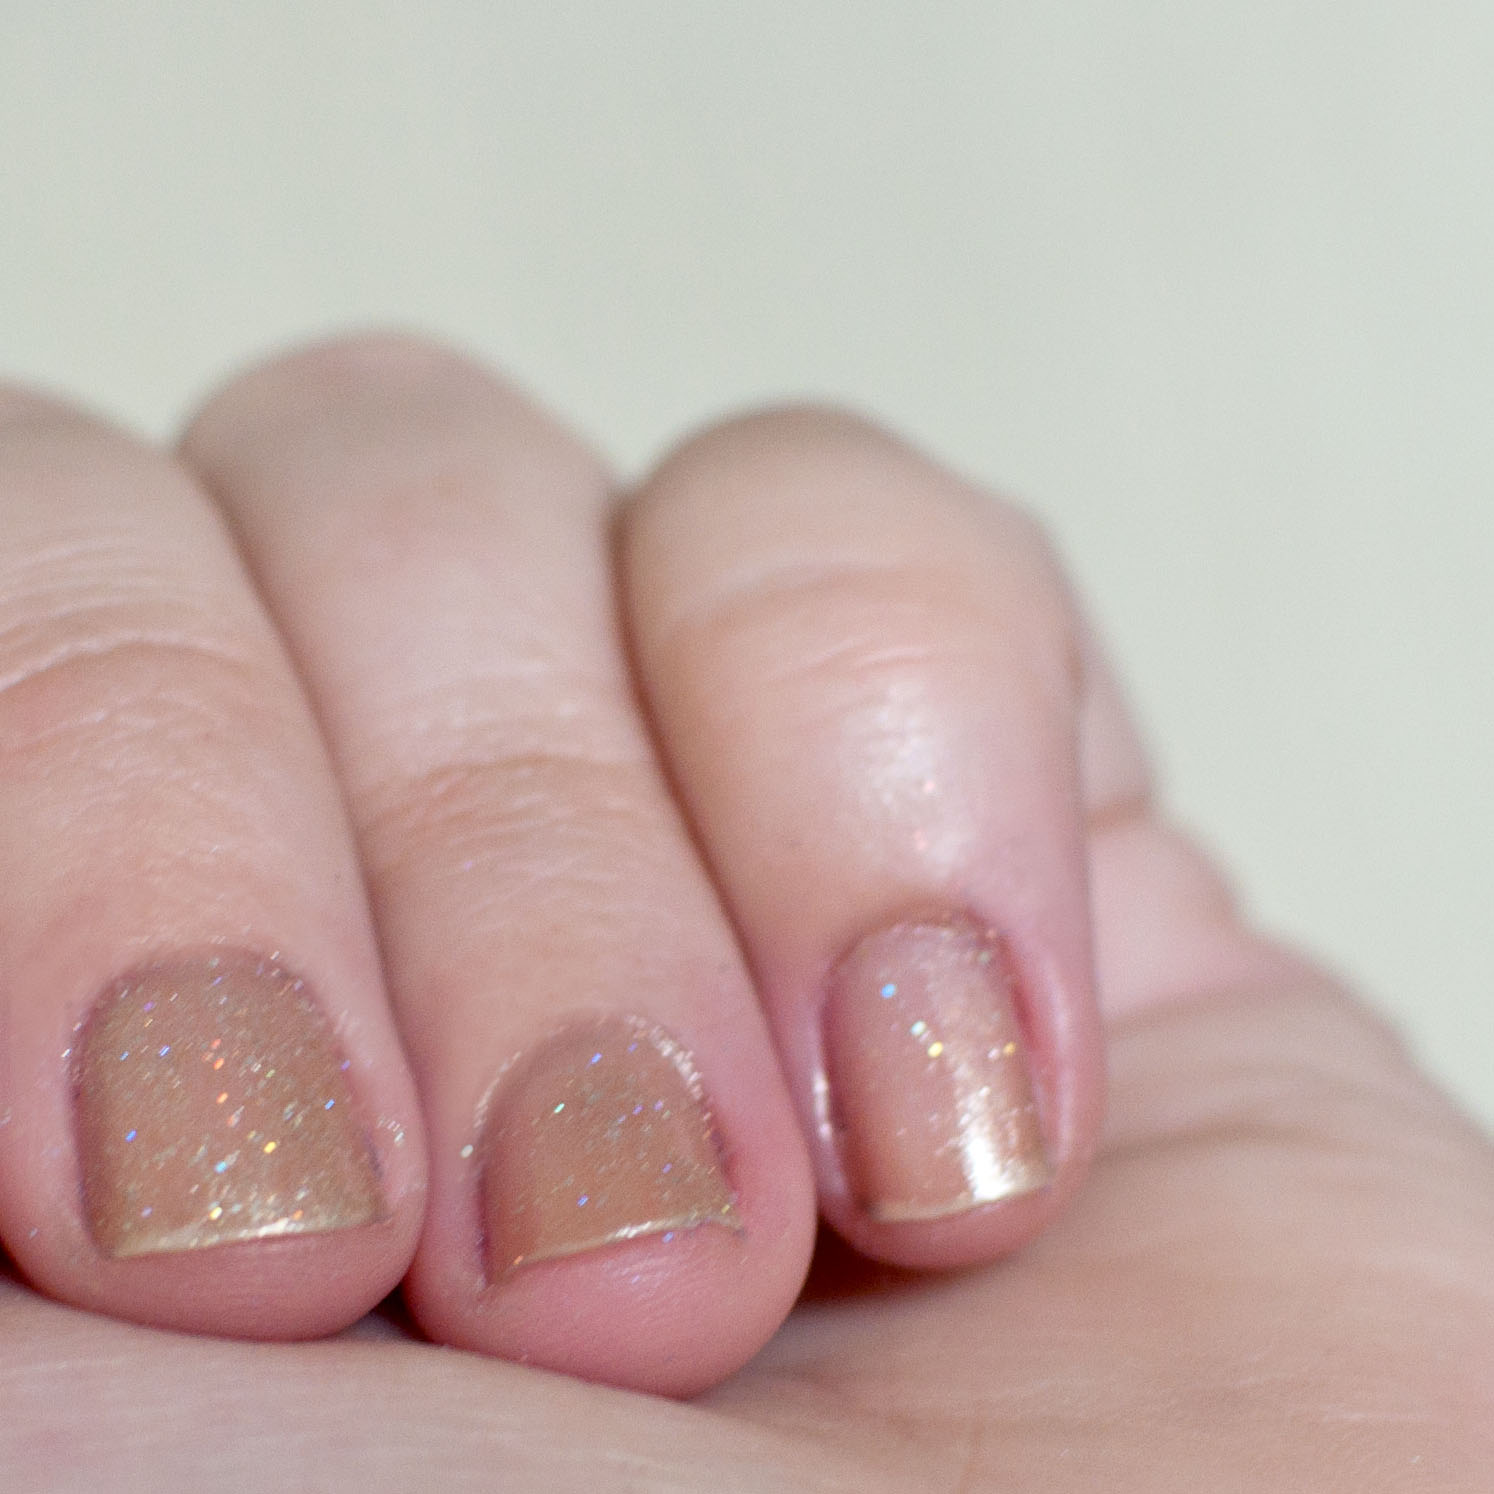
Promise Ring is next!  This one is really neat in the bottle, with holographic glitter coating the edges of the sweet gold paint. 
Promotional photo
I love this one, and it's great for layering.   Less of a glistening gold than I see in her pics (though there is a Julep I've seen paint out that way), but still really sweet and gorgeous.  She describes this one as "Brilliant foily silvery gold with holographic glitter and medium size round glitter particles throughout"
 
 (4 coats - 1 coat)

Fourth, let's take a look at "Unzipped", an intriguing griege with a metallic sheen.
Promotional photo
Explained as "Denim blue meets charcoal gray with an orange shimmer", I don't find any of the blue in here.  I do LOVE this one on my nails (I'm wearing it now), but wish the orange came out a bit more.  It is not as dark charcoaled grey for me as in her photos.
(4 coats - 1 coat)


Last, but certainly not least, is "Midnight Invite"
Promotional photo
"Midnight blue jelly-finish with opalescent flakies and bright aqua glitter particles" says Huemorista, and it truly is a gorgeous, glittered jelly!  I'd call it more of a cerulean than midnight, but this and "Unzipped" top my favorites list, by far.
 
(4 coats - 1 coat)

Overall review:  I wish that the photos weren't so altered that the color came out distorted - trust the description over the pics when ordering.  They all paint out beautifully, though the hex glitters tend to get stuck to the bottle, perhaps a suspension base would help with this.  The colors are unique and gorgeous, and I find myself hording them for sure.
In the future, I will most likely just order 3 of the same color, as they are sold in sets of 3 tiny bottles, and I'd rather have an average size of the ones I love.  I do wish it were an option to order 1 15ml bottle of a single color, instead.  Finally, for all the obvious work in marketing, editing, and the genius of creating these beauties, the packaging is a bit "arts and craftsy" to me, not in a great way.  I think simply getting a custom stencil made to etch a logo onto the bottle would keep it custom and classy, as opposed to the taped on labels and tags.

I encourage you, readers, to order from Huemorista, support her small business and tell her I sent you!  These are fun little treasures that any polish hoarder should keep in their secret collection.

 (Photo for size comparison)
Back to Top