Sorry this took so long! I've been a bit mad lately with the end of school and adjusting to one more mini-human running around the house all the time.
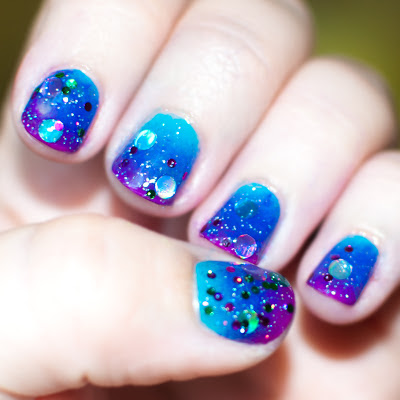
Reader Laurie asked for a gradient tutorial on my "Channeling Lisa Frank" manicure, so here I am presenting you with my method for gradient nails. It's a pretty easy, slightly time consuming method. Here's the finished look to the method we'll be focusing on today:
Reader Laurie asked for a gradient tutorial on my "Channeling Lisa Frank" manicure, so here I am presenting you with my method for gradient nails. It's a pretty easy, slightly time consuming method. Here's the finished look to the method we'll be focusing on today:

The first step is to gather all your materials. You'll need the polishes you're working with, a surface to mix them on (I use some leftover backsplash tiles from an old project - these are awesome if you're into other messy art things, you can wipe them off with acetone later), something to mix them with (toothpicks are the go to for a lot of folks, but I use a small piece of spaghetti - same as I do for water marbling) and something to sponge things onto your nail with. I tear into quarters one of those wedge makeup sponges.
The colors used, as with last time, are Sinful Colors "Dream On" and Love and Beauty "Aqua" (found at Forever 21 stores and online). Both are pretty cheap polishes with good coverage. Put a few generous drops near to each other on your mixing surface:

Then, take your mixing device (spaghetti, anyone?) and blend the colors a bit until a third is created. It doesn't look like a perfect gradient on the tile, just three colors. Pick it up on your sponge (as pictured) and sponge once on your nail. Let it dry for a few seconds (till it's pretty tacky), and put a second or third coat until your desired opacity is reached.

Here's a photo of mine after two layers of sponging:

Next, you'll want to clean up the polish that got on your skin and cuticles, of course. I use a stiff cheap eyeliner brush and pure acetone from Sally Beauty. You'll want to moisturize after using the acetone, but wait until you finish the whole manicure.
The final step for this look is a couple happy coats of Glitter Guilty's "In a Roundabout Way". Isn't it gorgeous??? Look at those multi-colored circles lurking at the bottom. They're surprisingly easy to fish out.

A shot pre-cleanup of my sponged nails and a few finished ones.
And finally, some glorious spam because this polish and manicure are SO enchanting I couldn't stop taking pictures. Yay spam!


 Posted by


2 comments:
Love it! Great tutorial!
Looks amazing!! I LOVE this polish SO SO SO SO SO SO SO much!! I also love the gradient! It really made this polish stand out to it's true beauty! THIS manicure specifically, has made me fall in love with Roundabout Way and Glitter Guilty!!
Post a Comment