2

Tutorial: Glitter topped gradient nails

Sorry this took so long!  I've been a bit mad lately with the end of school and adjusting to one more mini-human running around the house all the time.

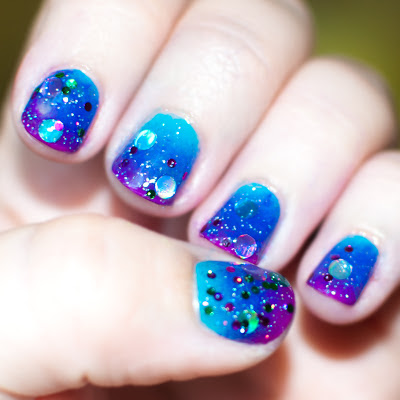
Reader Laurie asked for a gradient tutorial on my "Channeling Lisa Frank" manicure, so here I am presenting you with my method for gradient nails.  It's a pretty easy, slightly time consuming method. Here's the finished look to the method we'll be focusing on today:


The first step is to gather all your materials.  You'll need the polishes you're working with, a surface to mix them on (I use some leftover backsplash tiles from an old project - these are awesome if you're into other messy art things, you can wipe them off with acetone later), something to mix them with (toothpicks are the go to for a lot of folks, but I use a small piece of spaghetti - same as I do for water marbling) and something to sponge things onto your nail with.  I tear into quarters one of those wedge makeup sponges. 

The colors used, as with last time, are Sinful Colors "Dream On" and Love and Beauty "Aqua" (found at Forever 21 stores and online).  Both are pretty cheap polishes with good coverage.    Put a few generous drops near to each other on your mixing surface:


Then, take your mixing device (spaghetti, anyone?) and blend the colors a bit until a third is created.  It doesn't look like a perfect gradient on the tile, just three colors.  Pick it up on your sponge (as pictured) and sponge once on your nail.  Let it dry for a few seconds (till it's pretty tacky), and put a second or third coat until your desired opacity is reached.


Here's a photo of mine after two layers of sponging:


Next, you'll want to clean up the polish that got on your skin and cuticles, of course.  I use a stiff cheap eyeliner brush and pure acetone from Sally Beauty.  You'll want to moisturize after using the acetone, but wait until you finish the whole manicure.

The final step for this look is a couple happy coats of Glitter Guilty's "In a Roundabout Way".  Isn't it gorgeous???  Look at those multi-colored circles lurking at the bottom.  They're surprisingly easy to fish out.


A shot pre-cleanup of my sponged nails and a few finished ones.


The adorable "matchbox" tweezerman files I got from birchbox this month - how perfect are these??

 And finally, some glorious spam because this polish and manicure are SO enchanting I couldn't stop taking pictures.   Yay spam!


3

Glitter Guilty June 2013 box (Spoiler alert)

No spoiler bar this time, folks, because I did a mani featuring both my monthly mini as well as my full size custom.  I totally loved this month's box.  When I opened it and saw the mini gleaming gloriously from the box, I literally squee'd out loud.  Here's the lovely view I was treated to when I opened my box:


June's Monthly Mini is "Lime Rickey", a sublime neon purple jelly with a happy sprinkling of small fuschia round glitters, smaller still hex glitters in chartruese, gold, and transparent white.  It's finished off with teeny tiny iridescent blue and gold glitters throughout.  The base of this color is about the same as Sinful Colors "Dream On", for color reference.   This one is nearly as intoxicating as a few of it's namesake drinks.


My full size custom this month was pretty awesome as well.  Because, let's face it - I'm obsessed with circle glitters right now.  The jelly dove grey base is loaded with teeny iridescent blue glitters that meld with the base in a gorgeous way.  The larger glitters are all circles (YAY!) in small teal, medium fuschia, and large slightly blue-er teal.  It built nicely after three layers.

Here's three layers of each painted out.  There's something about that third layer that just brings out the bottle color.  The first two coats are pretty sheer, and suddenly the full glory comes out.  If I were trying to conserve the polish, I'd layer "Urban Island" over Zoya "Dove" and "Lime Rickey" over Sinful Colors "Dream On", as these colors represent the base colors pretty well.  Apparently my pinky and those pink circle glitters were getting along REAL nicely.
 (Three Layers "Urban Island, Three Layers "Lime Rickey")
 Here's one more shot, you can see a little bit more of the iridescent glitters in "Urban Island"

(Three Coats "Lime Rickey", three coats "Urban Island")


One more look at the box contents; Full Size "Urban Island", Monthly Mini "Lime Rickey", and TWO treats this month:  A "With Love Sammey" Refreshing Lime mini soak, and a caramel apple caramel - which may be gone now.  I'm sure it got eaten in a respectable manner, and not nom-nom-nommed ferociously due to it's deliciousness.  *innocent face*


A quick recap of the glitter guilty subscription program:
Officially named the "Glitter Guilty Pleasures Box" (oooh, naughty...), the program costs 15.99 per month and is easy to cancel at any time.  Included in the price is;
-1 Full Size custom polish influenced by your preferences
-1 Monthly Mini polish which is the same for all members
-1 bonus treat - in the cooler months it's chocolate (always a win)
(NOTE: this was the first month we received a non-chocolate treat.  I loved the caramel, and the mini soak was an EXTRA bonus item that is totally fitting with any polish-aholic's heart)


When you subscribe, you fill in your likes, as well as dislikes.  You can change it whenever you'd like, and I do after each month.  Here's what I listed for this month's box:

Colors you love: I'm currently OBSESSED with the big round holo glitters.   Also feeling Aquas, greys, and peach.
Colors you hate: Yellow, Orange, Pinks, heart glitter

Some random boxes receive a "golden ticket" of some sort.  I am always so blown away by the contents of my box I forget to be sad I haven't gotten one (yet!).  You may list who referred you - so if you're gonna sign up, please be sure to put my name in there!  It's "Frankie Caswell".  And you can sign up here.  If you refer two people, you should receive a "thank you" gift their second month of subscription, as long as you are still subscribing as well.  I love love love my box, and I hope you jump on board so you can love yours too!  
And if you're a current subscriber, feel free to drop a link to YOUR reveal box, because I'd love to see your polishes!

Rare Oregon Sunshine results in holo polish mani!

I Yes, we get our share of rain here in Oregon.   It's glorious, smells amazing, and leaves us with lush and diverse greenery everywhere. 

However.   It also most likely bred my taboo lack if obsession with holo polishes.   In fact I have only three in my possession...please don't murder me in my sleep, polish world!    

Here is the glorious "Strap on your Moonboots" by China Glaze.  


I love that it's gorgeous all on it's own.   Even minus the sun-seduced holographic curve, the almost denim blue is just dreamy.   

Keep an eye out, I've got that Lisa Frank gradient tutorial coming up soon!

xoxo
Constantly Undone
Back to Top